Order 24/7


StampinUp

Current Catalog

Holiday Catalog

Princess+Badge.png
Mojo Monday Blinkie

Copyright

The content in this blog (including text, photographs, and design work) is the sole responsibility and © of Shannon Jaramillo as an independent Stampin'Up! demonstrator. The use and content of classes, services or products offered are not endorsed by Stampin'Up!

Follow Me via Email

Enter your email address:

Social Links
Search

Entries in Halloween (7)

Thursday
Oct312013

A Spooky Halloween!

Happy Halloween everyone! Here is my last Halloween post for this year...another card for the little ones...

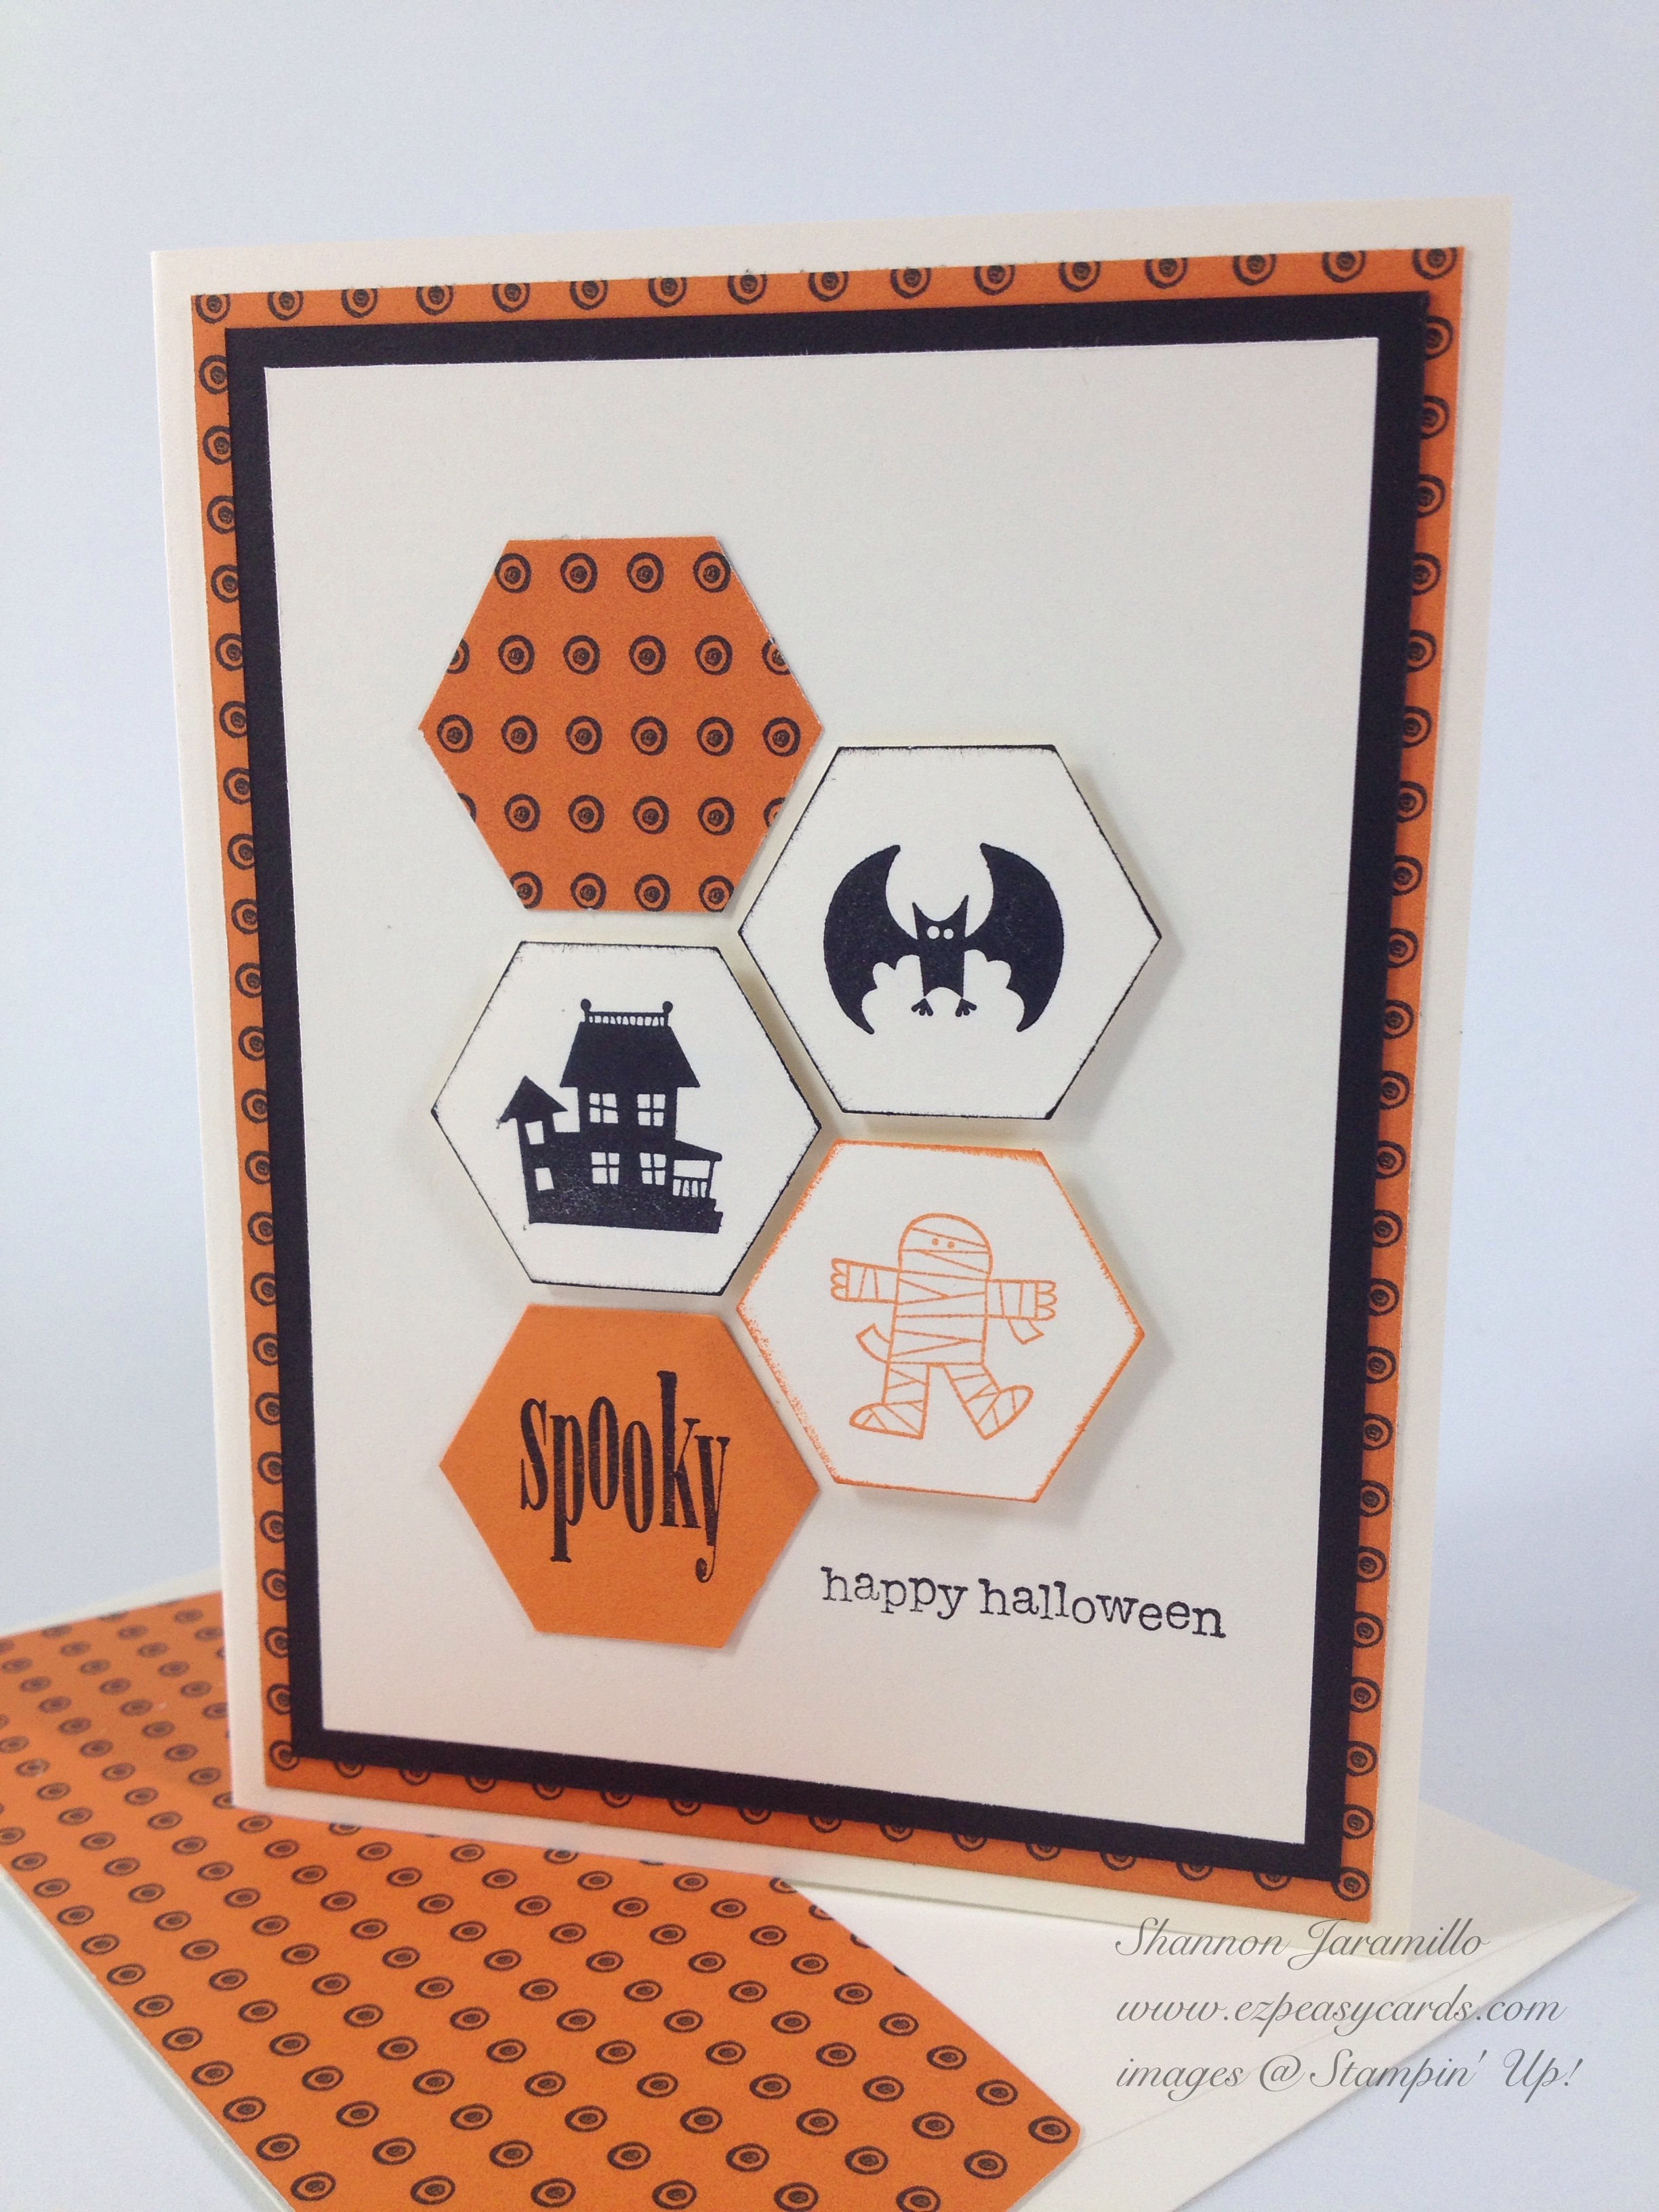
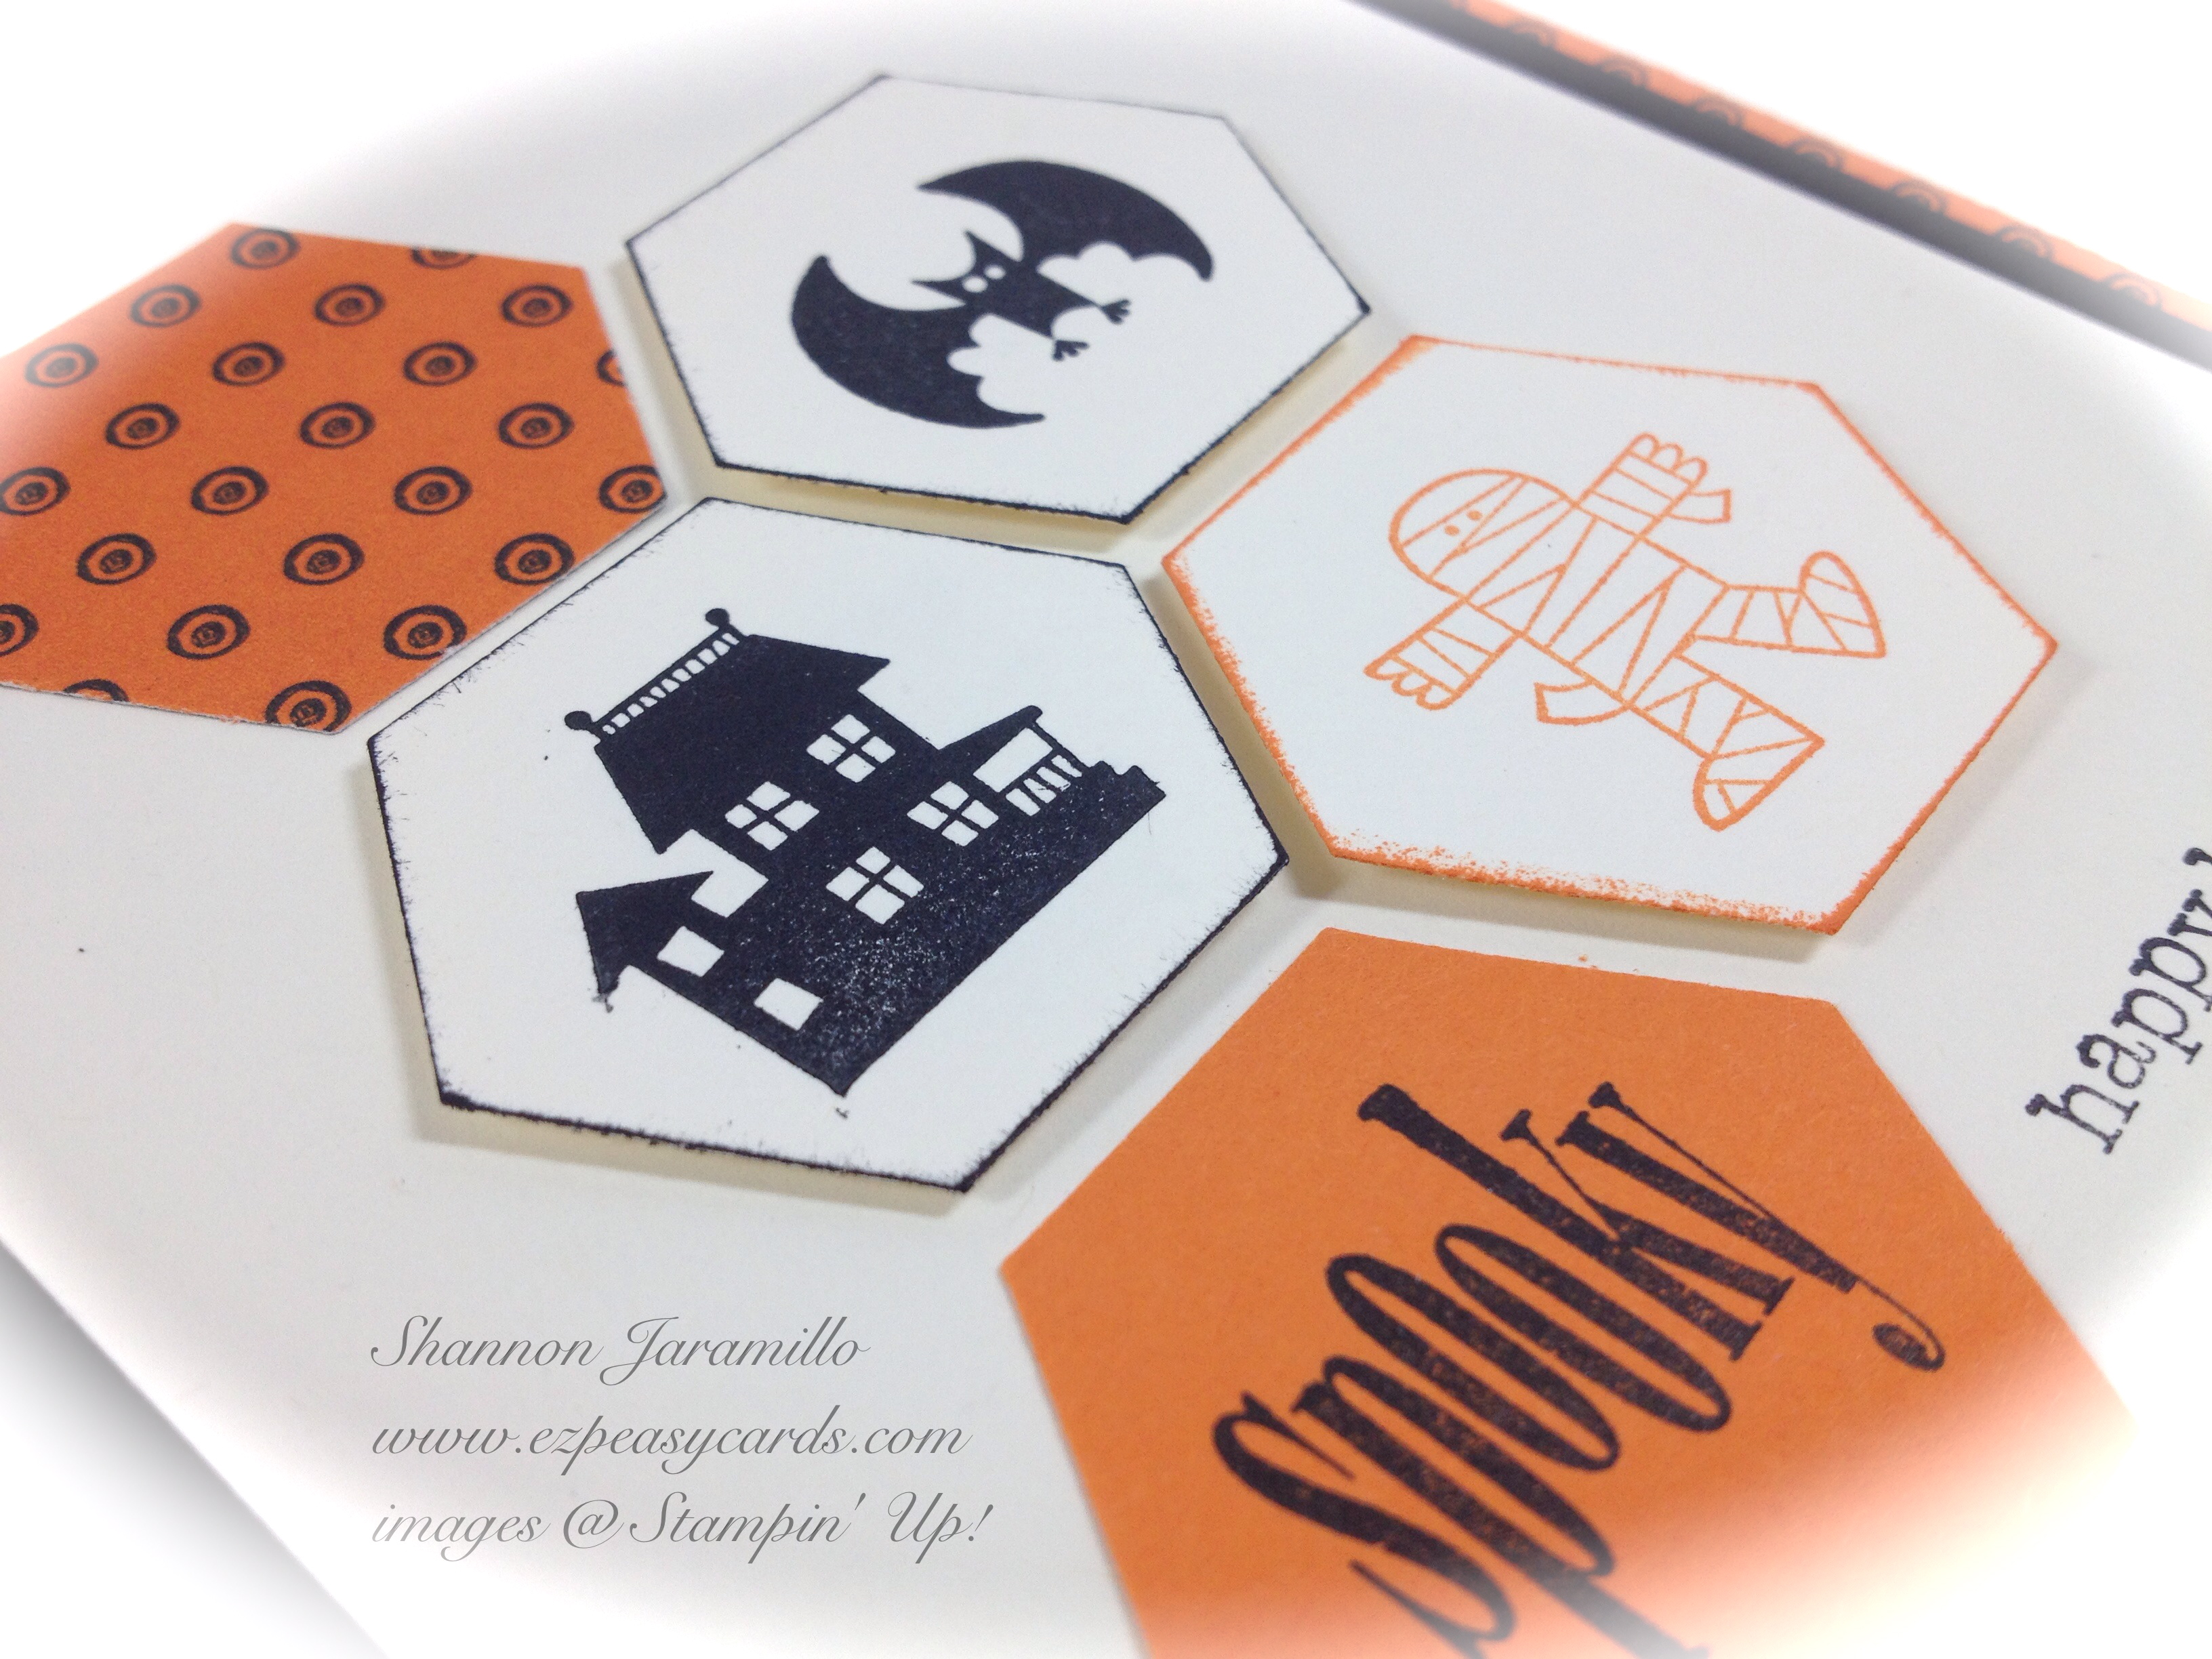
And once again, yep, I am using Spooky Bingo Bits! This stamp set is retired but a good alternative would be the current stamp set, Halloween Hello.

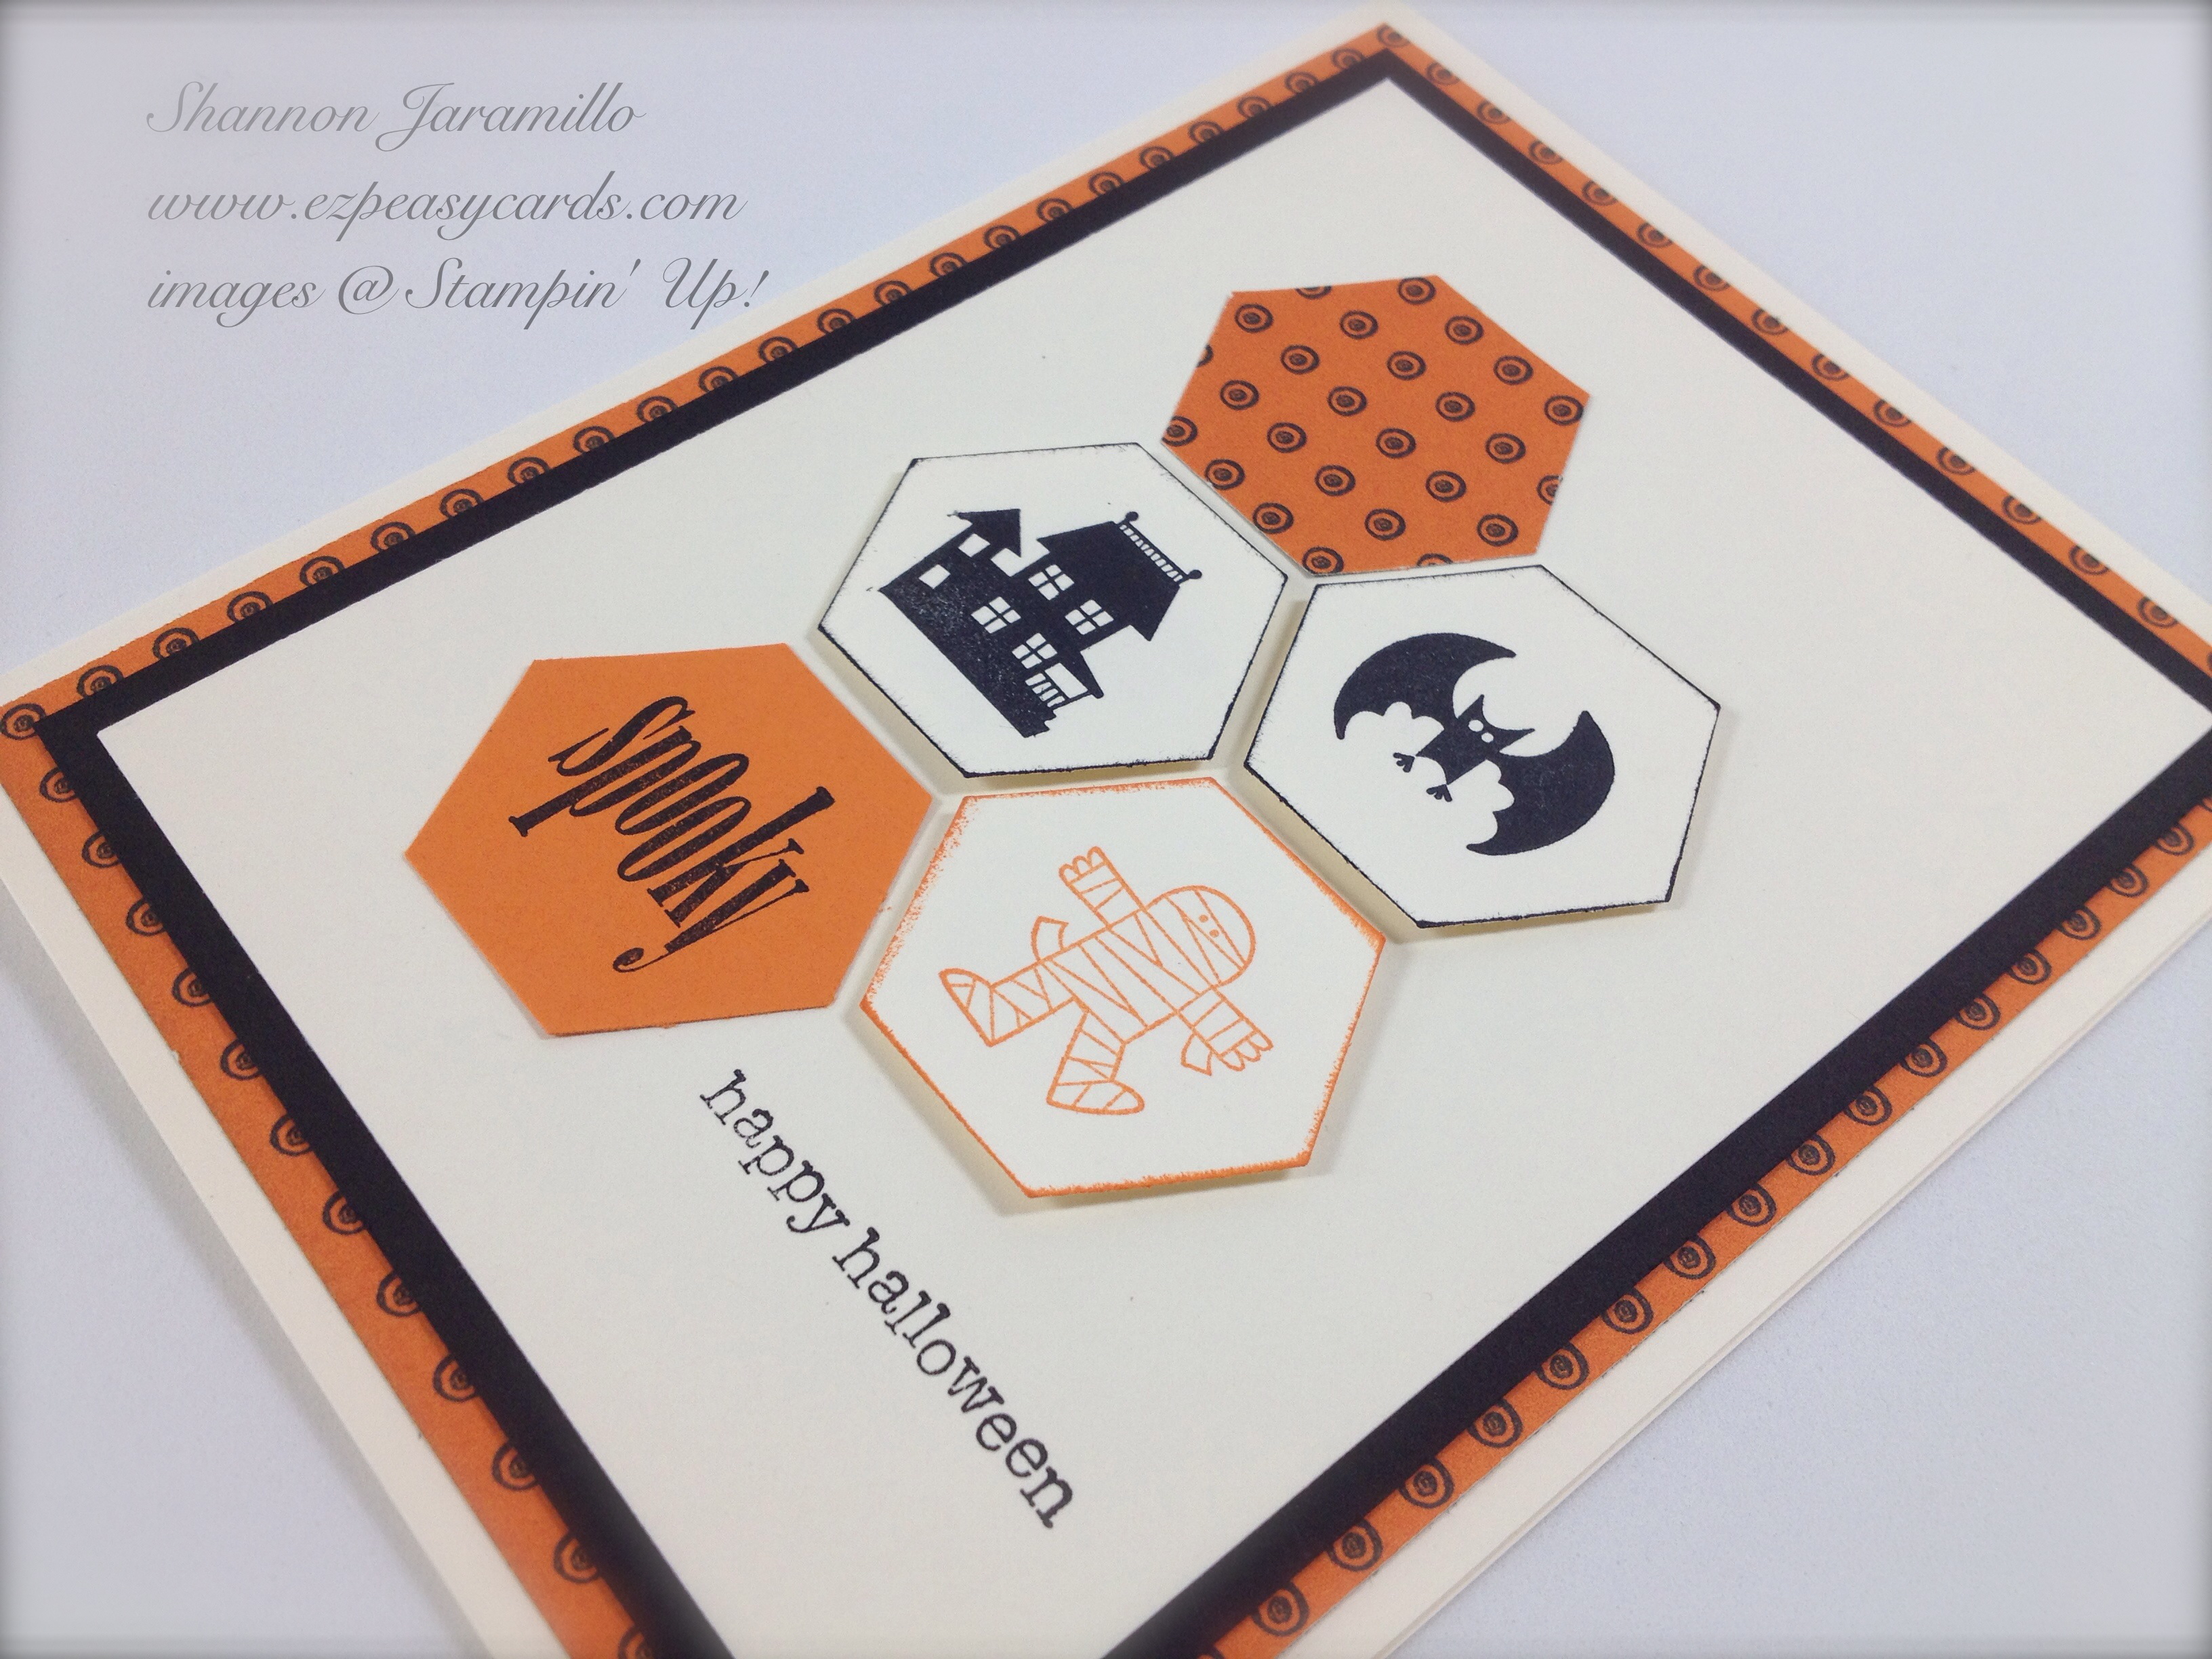
A layout on CAS(E) This Sketch, CTS#37, inspired this card. Isn't it fun?!? A few spooky images from Spooky Bingo Bits paired with a sentiment from Teeny Tiny Wishes, add in some super cute paper from the Witches' Brew Designer Series Paper pack and there you have a super easy, super fun card!

I hope everyone has a safe and not-too-spooky Halloween! My babies are all grown so I will be relegated to handing out candy (sigh) but at least it will be cutely packaged candy! lol

Stampin Supplies: 

Stamps: Teeny Tiny Wishes (127802), Spooky Bingo Bits (retired) Halloween Hello (131721) would be an alternative set

Paper: Very Vanilla (101650), Basic Black (121045) Cardstock; Witches Brew (132185) Designer Series Paper

Ink: Pumpkin Pie (126945) Classic Stampin' Pad; Black (101406) StazOn Ink Pad

Tools: Stampin' Trimmer (126889); Hexagon Punch (130919); Stamp-A-Ma-Jig (101049); Stampin' Dimensionals (104430)

Embellishments: None

Thanks for stopping by!

Tuesday
Oct292013

Not-So-Spooky Halloween

Today's card was created with the younger set in mind. I love Halloween images but don't want to scare the little ones! This card uses Spooky Bingo Bits, a retired stamp set. It could easily be re-created with the current stamp set Halloween Hello (131721), I just don't happen to own that set and I do this one! So there you have it!

This stamp set has never sen ink, and I don't know why! These images are just darling. The little yellow monster is my favorite! The inspiration for this card came from a card by Ashley Marostica. I loved her idea! I chose a color scheme based on the Witches' Brew Designer Series Paper and then added Old Olive and Elegant Eggplant for some more pops of color.

A little BOO!!! adds an itty bitty scare in Elegant Eggplant with a little help from the 1" Circle Punch and the 1 1/4" Scallop Circle Die. A few candy dots for jewelry!

I hope my nephew will like his card and not be toooo scared!! 

Stampin Supplies:

Stamps: Spooky Bingo Bits (retired) Halloween Hello (131721) would be an alternative set

Paper: Pumpkin Pie (105117), Basic Gray (121044), Elegant Eggplant (105126), Very Vanilla (101650), Basic Black (121045) Cardstock; Witches Brew (132185) Designer Series Paper

Ink: Pumpkin Pie (126945), Basic Gray (126981), Old Olive (126953), Elegant Eggplant (126969), Summer Starfruit (126991) Classic Stampin' Pad; Black (101406) StazOn Ink Pad

Tools: Stampin' Trimmer (126889); 1" Circle Punch (119868); 1-1/4" Scallop Circle Punch (127811); Stampin' Dimensionals (104430)

Embellishments: Brights (130931), Regals (130932) Candy Dots

Thanks for stopping by!


Saturday
Oct262013

Clean and Simple Saturday - Trick or Treat!

Hello Stampers! I'm back today with a bit more Halloween fun from the Best of Halloween 25th Anniversary Stamp Set! Isn't this witches' hat just darling?!?

I must be feeling much better than I have because last time I broke out the Thinlits Dies, this time I broke out the Washi Tape! I HAVE NEVER USED WASHI TAPE!!! There, I admitted it. And I will also admit that it wasn't hard to use :) I was actually very easy to use, I have no idea why I resist trying new things!

The bottom and top layers of this card are Very Vanilla, with a layer of Witches' Brew Designer Series Paper sandwiched in between. I liked the look of it rather than Basic Black cardstock, this is softer. Next I inked up a stamp from the Gorgeous Grunge stamp set with Pumpkin Pie ink first and then again in Basic Gray. I stamped off first before stamping onto my Very Vanilla cardstock so that the effect would be, again, very soft. Then a few lengths of Witches' Brew Designer Washi Tape. The washi tape is very easy to tear off, I just didn't want that look for this card, I wanted banners so it took just a bit more effort, but still simple!

Finally, I stamped the witches' hat with Versamark Ink and emossed with black embossing powder and then I fussy cut the hat out. The last step was the adorable sentiment stamped with Black StazOn Ink.

Just a few steps with coordinating Stampin' Up product and you have a really cute, more adult style, Halloween card. Have YOU tried washi tape yet? I challenge you to if you have not, I think you will love it!

Stampin Supplies:

Stamps: Best of Halloween (134381), Gorgeous Grunge (130517)

Paper: Very Vanilla (101650); Witches' Brew Designer Series Paper

Ink: Versamark (102283) Pad; Jet Black (101406) StazOn Ink Pad; Pumpkin Pie (126945), Basic Gray (126981) Classic Stampin' Pad

Other: Witches' Brew Designer Washi Tape (132156)

Tools: Heat Tool (129053); Black (109133) Stampin' Emboss Powder; Stampin' Trimmer (126889), Stamp-A-Ma-Jig (101049), Stampin' Dimensionals (104430)

Embellishments: None

Thanks for stopping by!

Monday
Sep162013

Tags 4 You - Halloween

Hello there and happy Monday to you! I hope you had a wonderful weekend! I was feeling crafty this weekend and I am excited to share my creations with you! I recently purchased the Tags 4 You stamp set from the Holiday Catalog and decided to create four cards with it, which I will share with you over the next four days.

Here's the first one!

Do you like it?!? This was super fun to put together so let me share some of the details...

  •  I used the Bitty Butterfly Punch and then used the circle punch from the Itty Bitty Shapes Punch Pack to snip off just a bit of the bottom butterfly wings to turn it into a bat (thank you Jason Loucks for the idea) 
  • I covered the bat with 2-Way Glue and then sprinkled liberally with Black Stampin' Glitter (which can be found on pg 20 of the Holiday Catalog)
  • Stampin' Up! doesn't carry orange glimmer paper so I made my own using adhesive sheets and Orange Stampin' Glitter (sold as a set along with the Black Stampin' Glitter)
  • The wavy line on the piece of black cardstock peeking out from underneath the Witches' Brew Designer Series Paper was created using the new Stampin' Trimmer Rotary Arm and Small Scallop Rotary Cutting Blade. I love the understated effect. 


How fun and easy is that! I hope you liked this first card...please be sure to stop by tomorrow to see the next card in this series! Here is a sneak peek of tomorrow's project:

Stampin Supplies:

Stamps: Tags 4 You (131820)

Paper: Very Vanilla (101650), Basic Black (121045) Cardstock; Witches' Brew (132185) Designer Series Paper

Ink: Jet Black Staz-On (101406) Ink Pad

Tools: Stampin' Trimmer (126889), Stampin' Trimmer Rotary Addition (129407), Small Scallop Rotary Cutting Blade (129410), Label Bracket Punch (132153), Itty Bitty Shapes Punch Pack (118309), 2-Way Glue Pen (100425), Stampin' Dimensionals (104430)

Embellishments: Black & Orange Stampin' Glitter (132206), Basic Black 1/8" Taffeta Ribbon (119261)

Sunday
Sep092012

Silly Mummy Treat Box

Follow Me on Pinterest

As promised, here is the companion project for my 'Silly Mummy' card because life is scary without chocolate! Wouldn't this make a great classroom treat bag? Or a Halloween party treat bag? It is so versatile and can easily be adapted to any occasion! My treat box is in fact adapted from a version that was introduced to Stampin' Up! demonstrators at a recent regional event.

 To create the box, use 2-7/8" x 6-3/4" cardstock; score horizontally at 2" and 4-3/4"; score vertically at 1/2" and 2-3/8". Crease the score lines using the Bone Folder. Where the score lines meet, create a "V"-shaped notch to facilitate folding and assembly. Die cut two tags in matching cardstock using the Two Tags Bigz Die and adhere them around the assembled box and decorate as desired! I stamped the sentiment and hand cut a banner and then adhered the banner to a toothpick. EZ Peasy!

Be warned though, choose another treat to put in your treat box. Mine is filled with white chocolate candy corn M&M's. They were chosen for their bright colors and I thought that they did not sound appetizing at all...sadly I was proven wrong. They are rediculously yummy and I would not reccomend bringing them into your home!!!

Stampin Supplies:

Stamps: Googly Ghouls (128063), Spooky Bingo Bits (123946)

Paper: Elegant Eggplant (105126), Whisper White (100730) Cardstock; Color Collection 2011-2013 Designer Series Paper Stacks (122384)

Ink: Elegant Eggplant (126969) Classic Stampin' Pads

Tools: Big Shot (113439), Two Tags Bigz Die (115954), Delicate Doiles Sizzlits L (126999), 1-3/4" Circle Punch

Embellishments: Googlies Adhesive Backed Googly Eyes (127539), 3/8" Taffeta Ribbon in Pumpkin Pie, 1/2" Striped Satin Ribbon, 4" x 6" Cellophane Bag (102757)

Thanks for stopping by!